Beginning writers and readers (pre-k through Kindergarten)
Teaching Cursive
Organize Materials
magnetic white board and dry erase pens
paper and pens (pencils for the very young)
magnetic letters
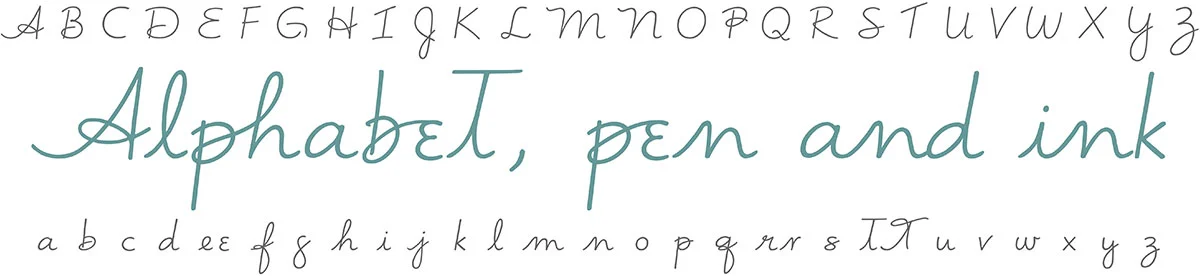
The Vimala Guidebook –Alphabet, pen, and ink– (and / or printouts of the Vimala Alphabet™)
Alpha-Phonics word lists (written out or printed with the Vimala Alphabet™)
Bob books (and / or other early readers)
Patience, patience patience!!
Humor, smiles, enthusiasm, lightheartedness, lots of praise, and love
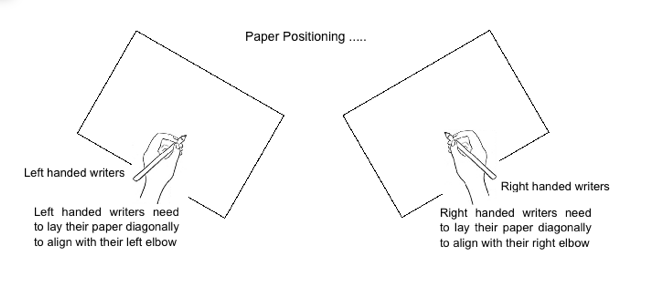
Paper Positioning
Introducing the Alphabet
The Concept of Letters as Sound Symbols
For pre-school or Kindergarten, first and foremost the child must learn to recognize each letter by name. Once all the letters are known by sight, it is time to understand how these amazing ‘sound-symbols‘ translate into written, readable language.
Cursive is easily taught from the very beginning. The brain that learns to write cursive can read print, while one that has only been taught to print cannot read cursive nor benefit from the greater creation and support of incredibly rich neural pathways that cursive engenders.
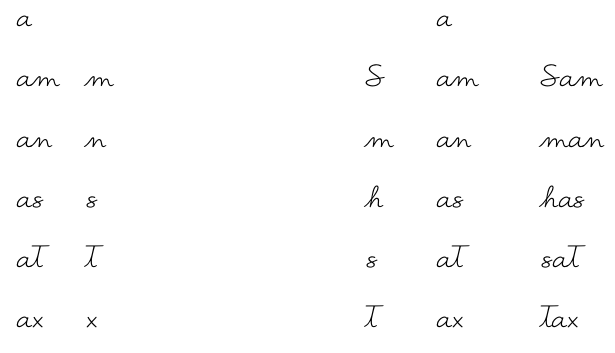
Introduce one letter at a time by finding the letter in a book or magnet set. Have the child identify the letter ‘a’ first. Say the letter with the child, then explain how the letter ‘a’ makes a sound in words. Say the ‘short a.’ Write the Vimala Alphabet™ letter ‘a.’ Repeat the ‘short a’ sound. Explain how by itself, the ‘a’ is just a sound that doesn’t mean anything until it is put with other letters that also have distinct sounds. When this happens, words appear!
Next say some simple ‘short a’ words as you write them out. Write a column of six a’s, then add a consonant to the second a, the consonant ‘m’ and say the word ‘am.’ Use this word in a sentence, “I am so happy we are learning our letters together,” for example. Have the child identify the letter ‘m,’ and say the ‘m’ sound. Ask the child to sound out the ‘a’ and the ‘m’ and then put them together to say the word ‘am.’ Write the word ‘am’ again next to your column.
Next write an ‘n’ after the third ‘a’ in the column and say the word ‘an.’ Use this word in a sentence, “We are making an interesting list of words,” for example. Have the child identify the letter ‘n,’ and say the ‘n’ sound together. Ask the child to sound out the ‘a’ and the ‘n’ and then put them together to say the word ‘an.’ Write the word ‘an’ again next to your column.
Write an ‘s’ after the fourth ‘a’ in your column as you say the letter ‘s’ and then sound out the word ‘as.’ Sound out the hissing sound of the ‘s’ with the child. Now ask her to sound out the ‘a’ and ‘s’ together to make the word ‘as.’ Can she help you think of a sentence using this word? “We will have a snack as soon as we finish here,” for example.
Write a ‘t’ after the fifth a in your column as you say the letter ‘t’ and sound out the word ‘at.’ Ask the child to identify the letter ‘t’ and say the ‘tuh’ sound. Sound out the ‘short a’ and ‘t’ together saying the word ‘at.’ Make a sentence using the word ‘at.’ “We are sitting at the table,” for example.
Write an ‘x’ next to your last ‘a’ in the column. Ask the child to identify this letter. Sound it out together, then sound out the ‘a’ and the ‘x’ to hear the word ‘ax.’ Hand the child the pen and ask her to write an x making sure that (as with all letters, the ending stroke ends to the right — always moving forward). So the ‘x’ is formed with a diagonal line that moves leftward from the righthand top to the baseline, lifting the pen, and drawing another diagonal line that moves rightward from the left top to the baseline (ending right). First: / Next: \ Completed: X. Ask the child to write a Vimala Alphabet lowercase a also. This is an oval letter. Discuss how different these letters feel.
Finishing this first introduction into reading and writing, review your column of words and letters.
SecondLesson
Review this first introduction into reading and writing by making your letter ‘a’ column again, then adding the five consonants that make the simple words ‘am,’ ‘an,’ ‘as,’ ‘at,’ and ‘ax.’ Expand on these words by adding the same letters to the beginning of the words plus a new letter, the letter ‘h.’
Each time a letter is reviewed, the child identifies the letter and says the sound it makes. Words are sounded out and the child watches as you write. Once a firm understanding of how the words are formed, ask the child to write the letters.
Be aware of the child’s attention and energy levels. There is a lot for a child to process; her mind is being stretched to a new understanding and her small motor skills are developing. Take it slow. Keep learning sessions short, ten or fifteen minutes for the very young. Children are unique. Some are ready at three, others are not ready for this until six or a little older. It doesn’t mean one is better or smarter than another … it is simply that we each adapt to reading and writing at a very personal pace. It is exciting for everyone as the pieces of the alphabetical puzzle come together! Sounding out words and later sentences is most fulfilling.
At this point you can explain that the letter ‘a’ is a power letter, also known as a vowel. Vowels have breath and give our words sound. The other letters introduced so far have been consonants. They give words structure. In other words, vowels are like water and consonants are like its containers. The ‘a’ sound is shaped by the sounds of the consonants around it.
The course of teaching continues following the phonetic order laid out by Samuel Blumenfeld in his book ‘How To Tutor’ and the Alpha-Phonics reader sets. I suggest either writing the lists of words out by hand with the Vimala Alphabet™ or getting the Vimala Alphabet™ font available from vimalarodgers.com to type and print out these lists. Laminating them for durability is highly recommended. These are helpful for review as more and more letters, letter sounds, and blends are introduced.
After the next few lessons, letters that have lower zone components will be introduced (g, j, y, p and so on). As these are introduced, discuss the three zones in handwriting: middle, upper and lower zones. Note how we keep them in balance, writing so that the upper zone is about twice as tall as the height of the middle zone letters, and the lower zone is about twice as long as the height of the middle zone letters.
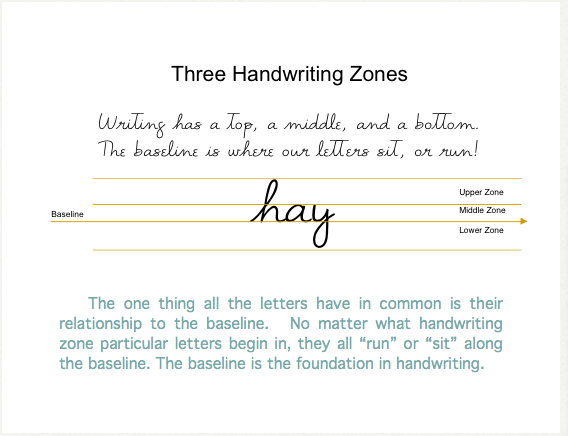
The Three Handwriting Zones: a top, a middle and a bottom, or the upper, middle and lower zones.
The baseline is where our letters sit, or run! Some part of every letter touches the baseline and all the letters live in part or wholly in the middle zone. When they climb into the upper zone they measure up 2 or 2-1/2 times as high as the middle zone letters. When they dive down into the lower zone, they drop 2 or 2-1/2 times the height of the mid-zone letters.
With practice, a rhythm occurs naturally as the pen moves across the page. It’s important to finish upper and lower zone loops. Notice that the lowercase f is the only lowercase letter that occupies all three zones. Also notice that upper zone loops begin softly at the baseline and finish close to the baseline. (look at the h and y in the example above)
Make practice time casual and lighthearted. Remember handwriting is a very technical skill, young children may tire easily.